Deploy a forest monitoring service from a template
Monitoring the health and dynamics of our planet’s forests stands as a cornerstone of Earth observation efforts. As one of the most classic applications of this field, forest monitoring plays a pivotal role in understanding ecosystem health, biodiversity, and climate change impacts.
In this step-by-step tutorial you will learn how easy it is to deploy a cloud-based service for forest monitoring using SPAI, going through concepts such as what a SPAI template is, how to customize them and how to deploy them effortlessly.
What is a template?
A SPAI template is nothing more than a SPAI project that is already ready-to-use for a specific use case, such as forest monitoring, fire risk calculation, flood mapping and countless other applications, being an excellent way to demonstrate the value of earth observation data. The possibilities are endless! You just need to start with a SPAI project and start creating your very own template.
Clone a template
The first thing we are going to do is clone the forest monitoring template locally, and inspect its modules and details.
Remember that you need to have SPAI installed to be able to clone templates and be authenticated to deploy them.
Cloning a SPAI template is as easy as running a single CLI command. In this case, we want to clone the forest-monitoring template.
spai clone forest-monitoringWith something so simple we have cloned and created the template locally, in the folder where we have executed the command and with the name forest-monitoring.
Project structure
The forest monitoring template structure follows the same structure as a SPAI project, simply ready to be used. Let’s see it.
/forest-monitoring
  |- /scripts
     |- /downloader
        |- main.py
        |- requirements.txt
        |- .env.example
     |- /forest-monitoring
        |- main.py
        |- requirements.txt
  |- /apis
     |- /analytics
        |- main.py
        |- requirements.txt
     |- /xyz
        |- main.py
        |- requirements.txt
  |- /uis
     |- /map
        |- main.py
        |- requirements.txt
  |- README.md
  |- spai.config.yaml
  |- spai.vars.json
As we can see, it has the apis, scripts and uis folders. If we inspect any of the scripts in the subfolders, we will see that they are ready to be executed and deploy a service for forest monitoring.
Some files are a little more special and specific. In the README we have information about the template,
such as what it is used for, what variables it needs and other important information for the service.
On the other hand, and as you already know, the spai.config.yaml file contains the configuration for your project. Let’s take a look.
project: forest-monitoring-template   # name of the template
storage:
  - name: data
    type: s3   # cloud storage
scripts:
  - name: downloader   # downloads Sentinel-2 images on a given AoI and time interval
    run_every: "0 0 * * *"    # download images every day (in minutes)
    run_on_start: True   # download images on start
  - name: forest-monitoring   # analyze the images to get vegetation health and growth
    run_every: "0 0 * * *"    # analyze images every day (in minutes)
    run_on_start: True
apis:
  - name: analytics   # api to serve the analytics from the forest monitoring
    port: 8021
    host: localhost
  - name: xyz   # api to serve the visualizations of the layers
    port: 8022
    host: localhost
uis:
  - name: map
    # command: npm run dev # for local development
    command: npm run deploy
    port: 5173
    runtime: node
    env:
      ANALYTICS_URL: api.analytics
      XYZ_URL: api.xyz
What we see are the different services that make up the forest monitoring template, and how they are configured.
First of all we have the storage defined, then the scripts, first to download images and analyze them, then the apis,
to be able to serve the results, and the ui, to be able to visualize the results. Everything is defined in this file.
🚨 Important! By default, all the templates come with the storage type as
s3, but you can change it tolocalto run it locally.
UIs
UIs can be developed using Python or Node. By default the runtime is python, but node can be set.
To develop and deploy UIs with Python, for example with Streamlit, you simply need to add the relevant command to spai.config.yml. Make sure you use the correct command depending on whether you are working locally or in the cloud, as shown.
uis:
  - name: map_streamlit # by default, runtime is python
    command: streamlit run main.py --server.address 0.0.0.0 --server.port 80 # for cloud deployment
    # command: streamlit run main.py --server.address localhost # for local development
    port: 8501
    env:
      ANALYTICS_URL: api.analytics
      XYZ_URL: api.xyz
If, on the other hand, you prefer to develop your UI with Node, you should take the following into account. If you want to work locally, simply running npm run dev you can deploy your UI. However, if you want to deploy it in the cloud you will have to install Vite and add a deploy command to the scripts of your package.json, as shown in the example.
"scripts": {
		"deploy": "vite build && vite preview --host 0.0.0.0 --port 80"
	}
Finally, you should just add the commands and runtime to your spai.config.yml.
uis:
  - name: map
    command: npm run deploy # for cloud deployment
    # command: npm run dev # for local development
    port: 5173
    runtime: node
    env:
      ANALYTICS_URL: api.analytics
      XYZ_URL: api.xyz
🚧 We are working on greater support for Node. Right now, environment variables in a
spai.vars.jsoncannot be used in a UI developed with Node.
Global variables
Last but not least we have the spai.vars.json file. This file defines the global variables that the services needs to run,
such as the areas of interest or the time interval in which you want to do the forest monitoring. Let’s look at this file.
{
    "AOI": {
        "type": "FeatureCollection",
        "features": [
          {
            "type": "Feature",
            "properties": {},
            "geometry": {
              "coordinates": [
                [
                  [
                    1.862134664294473,
                    41.311939344022136
                  ],
                  [
                    1.9838127101556609,
                    41.311939344022136
                  ],
                  [
                    1.9838127101556609,
                    41.35612559523389
                  ],
                  [
                    1.862134664294473,
                    41.35612559523389
                  ],
                  [
                    1.862134664294473,
                    41.311939344022136
                  ]
                ]
              ],
              "type": "Polygon"
            }
          }
        ]
      },
    "DATES": [
        "2020-01-01",
        "2020-01-15"
    ]
}
For this template we simply have two variables: AOI, which is nothing more than the geometry in GeoJSON format of our area of interest, and DATES, which is the time interval. These variables are given by default in the
template so that it can be executed and deployed without having to worry about them, but of course you can change them freely.
In the last section we will see how to do it.
You can also define environment variables in the
spai.vars.jsonif necessary. They will be exposed to all services like te rest of variables.
Running the template locally
Now that we have seen what the forest monitoring template has, let’s run it! Navigate to your project folder and first of all, run the following command to install all the necessary dependencies.
spai installThis command is important to ensure that all the necessary dependencies and packages are installed in our environment. Now, run the following command to start your project locally.
spai run💫 Pro tip! You can run a template and install the requirements all in one with the
-iflag.spai run -i
🚨 Important! Uncomment the
commandline for the UI service marked as “for local”.
As processes are executed you will see messages in the CLI. If everything works as expected, you should have the forest monitoring service running locally! Let’s check out our newly executed service by going to the localhost:8501.
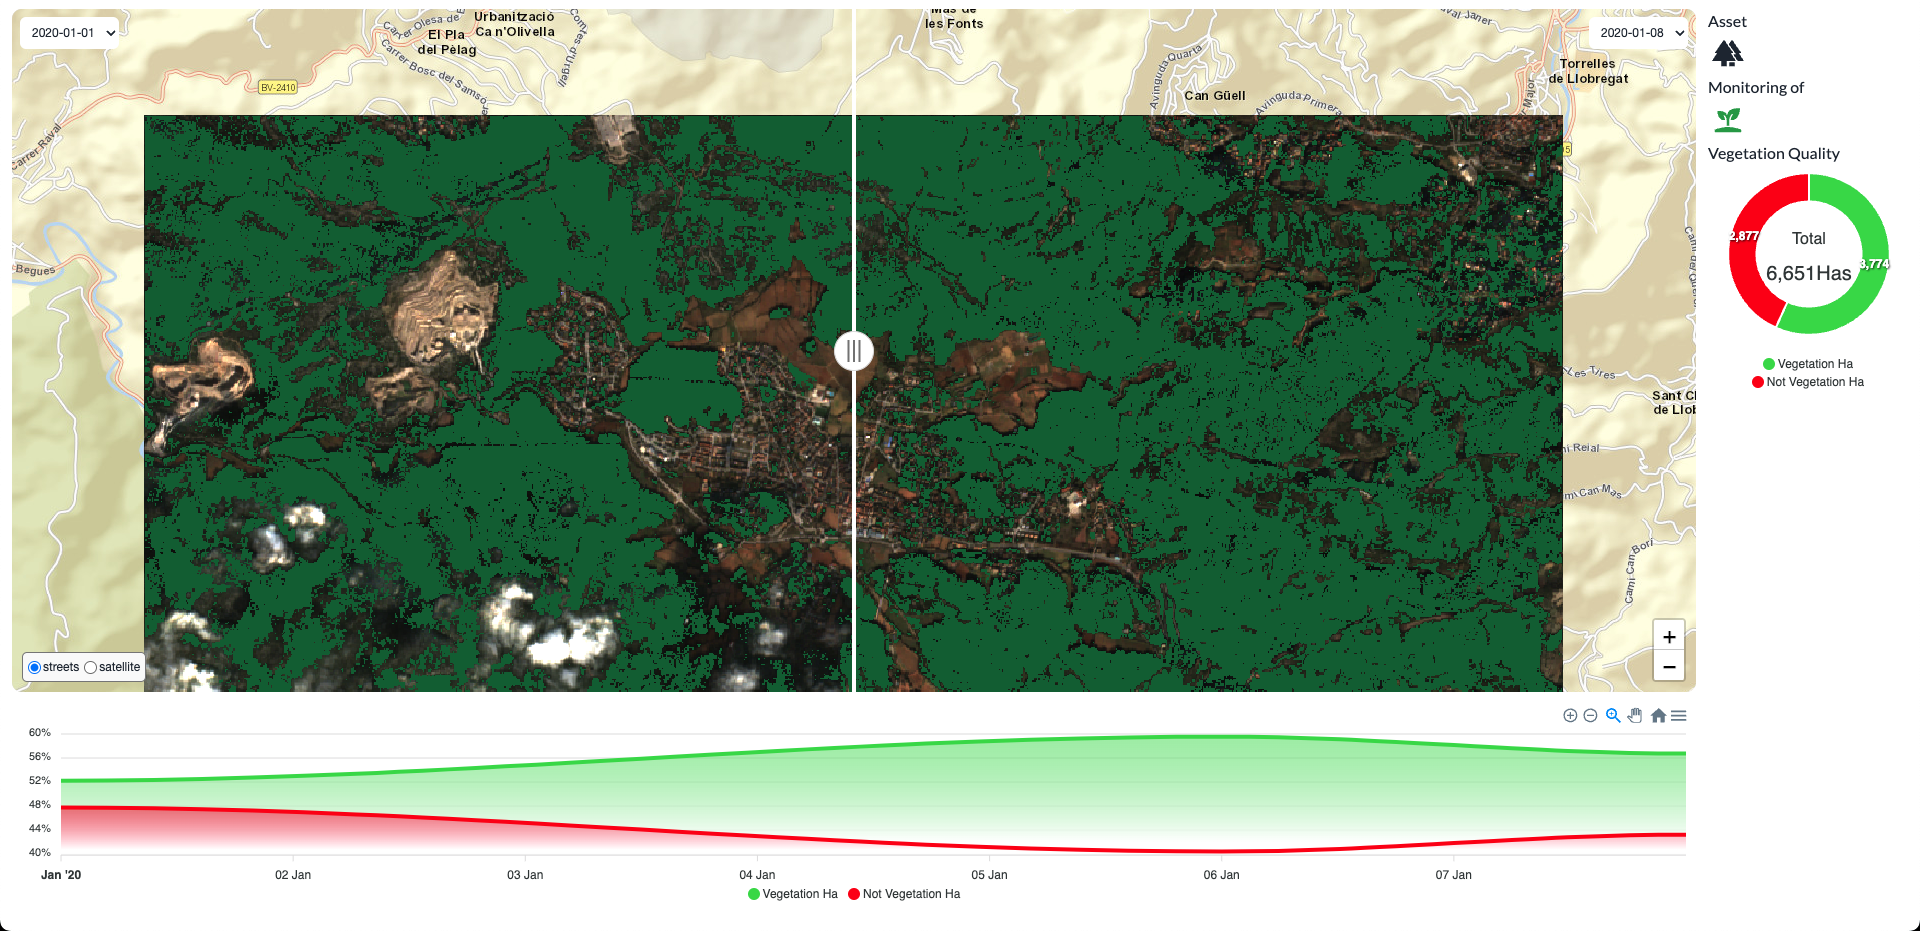
Now, you can interact with the APIs and UI at the specified ports on your localhost. The scripts will be running in the background every day. You can check the logs of the services in your terminal.
Deploying the template in the cloud
Deploying your project in the cloud is as easy as running the following command:
spai deployThe first time that you run the
deploycommand, you will be asked to login if you haven’t done it yet. You can also do it with the following command:spai auth login
After running the deploy command, you will get a URL to your dashboard where you can track the status of your project as well as get public URLs for your APIs and UI and access to the logs.
As you can see, you don’t have to worry about setting up servers, databases, or any other infrastructure. We take care of that for you, provisioning the necessary resources in the cloud and managing them for you. You can focus on writing your code and let us take care of the rest.
Running a ready-to-use template
Everything we have seen shows how easy it is to customize and deploy a service for forest monitoring with SPAI. But wouldn’t it be incredible to be able to do the same thing we have done, without having to clone the template locally? Wouldn’t it be fantastic to be able to deploy it to the cloud simply with a command?
Well, actually you can do it! All you have to do is add the -t flag to the command, either run or deploy, and add the name of the template.
For example, the following command does it all in one fell swoop: it clones the template and runs it locally.
spai run -t forest-monitoringAnd what happens if we want to do it directly in the cloud? Very easy! Just use deploy!
spai deploy -t forest-monitoringAnd voilà! We already have a service for forest monitoring in the cloud.
😍 Isn’t it great? With a single command or a single click you can have all the power of Earth observation data at your fingertips!
Changing the variables of the template
The power of SPAI templates is that they are reproducible anywhere in the world and at any time (as long as images are available!). So, we have to be able to change both the area of interest of the template and the time interval. Of course this can be done, in two ways.
Manually edit the spai.vars.json
The first option, and possibly the easiest, is to clone the template locally via spai clone forest-monitoring and then manually edit
the spai.vars.json. For example, we can change the AOI and dates.
{
    "AOI": {
        "type": "FeatureCollection",
        "features": [
          {
            "type": "Feature",
            "properties": {},
            "geometry": {
              "coordinates": [
                [
                  [
                    34.83555873553843,
                    -19.83974706325712
                  ],
                  [
                    34.86460781968074,
                    -19.83974706325712
                  ],
                  [
                    34.86460781968074,
                    -19.82484010854384
                  ],
                  [
                    34.83555873553843,
                    -19.82484010854384
                  ],
                  [
                    34.83555873553843,
                    -19.83974706325712
                  ]
                ]
              ],
              "type": "Polygon"
            }
          }
        ]
    },
    "DATES": [
        "2024-08-15",
        "2024-08-30"
    ]
}
Edit variables via CLI
The second option is to edit the variables via CLI when executing a spai run or spai deploy, adding the -v flag to edit the variable.
For example, if we want to edit the dates:
spai deploy -t forest-monitoring -v DATES='["2020-02-10", "2020-02-15"]'And on the other hand, if we wanted to edit the area of interest, we should pass its geometry as a GeoJSON:
spai deploy -t forest-monitoring -v AOI='your-new-geometry'With these simple commands, you can change the template variables as you like! Feel free to try it at different locations and times!
What’s next?
In this section we have learned in a practical way what templates are, how to edit them and how to deploy them. But this is only the beginning! We encourage you to let your imagination fly and start creating templates with SPAI.
Continue in this tutorial section to learn how to create and deploy from scratch a service to monitor Water Quality, using all the power of SPAI and its functions.
If you prefer to dig deeper into the platform, you can check the reference section to learn more about the different components of the platform, including the CLI and the Python library to build your own applications.
Back to topJoin our Discord to be part of the community, get in touch with other developers and be part in shaping the future of Earth Observation 🛰️